

From Git Push to Live Site: Deploying a Next.js App to cPanel Node.js Shared Hosting
A step-by-step guide for deploying and automating a Next.js or Node.js app on cPanel shared hosting with GitHub Actions, SSH keys, and safe release checks.
If you have only deployed Node.js applications on Vercel, Netlify, or your own VPS, cPanel shared hosting can feel strange at first. The good news is that it works fine once you understand the rules.
In this guide, I will show the exact journey for taking a Next.js project, pushing it to GitHub, connecting GitHub Actions to cPanel with an authorized SSH key, and letting every push to main deploy the application automatically.
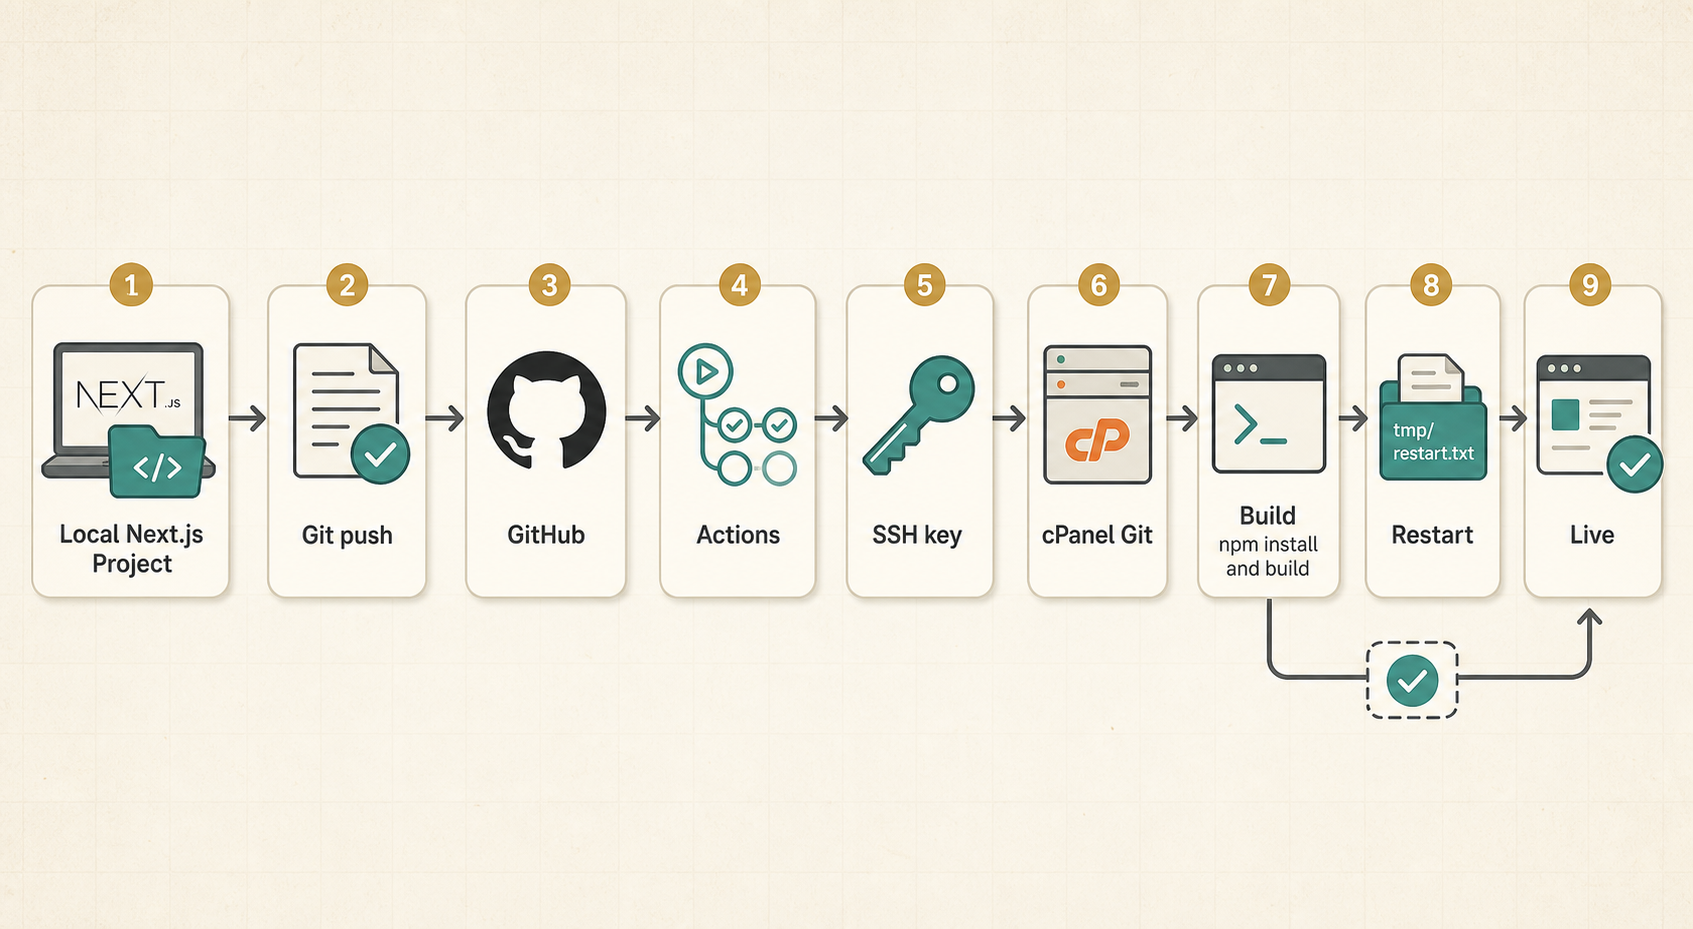
What we are building
By the end of this tutorial, the deployment flow looks like this:
- You keep your Next.js project in Git and GitHub.
- GitHub Actions runs a deployment workflow every time you push to
main. - GitHub connects to your cPanel server over SSH using a private key stored in GitHub secrets.
- The server pulls the latest code, installs dependencies only when needed, builds the app, restarts the Node.js application correctly, and checks that the new assets are really live.
This is not the only way to deploy to cPanel, but it is a solid approach when you want safer automated releases instead of manually uploading files every time.
Before you start
Make sure you already have these items ready:
- A cPanel hosting account with Setup Node.js App enabled.
- SSH access enabled for that cPanel account.
- A Next.js or Node.js project that already runs locally.
- A GitHub repository for the project.
- A domain or subdomain already pointing to the cPanel account.
If your hosting plan does not support Node.js applications or SSH access, this workflow will not work on that plan.
Step 1: Prepare the project for cPanel
The first important idea is that cPanel should manage the running process. Do not treat shared hosting like a VPS where you manually keep node server.js running in a terminal.
For this project, the custom startup file is server.js:
import { createServer } from 'node:http'
import { parse } from 'node:url'
import next from 'next'

const dev = false
const hostname = '0.0.0.0'
const port = Number.parseInt(process.env.PORT ?? '3000', 10)
const app = next({ dev, hostname, port })
const handle = app.getRequestHandler()

app.prepare().then(() => {
  createServer(async (request, response) => {
    await handle(request, response, parse(request.url, true))
  }).listen(port, hostname)
})
This works well on cPanel because the Node.js app can point to one startup file and let Passenger or LiteSpeed handle the process lifecycle.
You should also make sure your package.json includes clear scripts:
{
  "scripts": {
    "dev": "next dev",
    "build": "next build",
    "build:production": "next build --webpack",
    "start": "node server.js"
  }
}
Why use build:production here?
In this setup, the production deployment uses:
npm run build:production
That gives you a single explicit build command for the server workflow. In this repo it uses next build --webpack, which is useful when you want a predictable server build path for hosting environments like cPanel.
Step 2: Add the project to Git and GitHub
If your project is not in Git yet, initialize it:
git init
git add .
git commit -m "Initial commit"
Then create a GitHub repository and connect your local project:
git remote add origin git@github.com:YOUR_USERNAME/YOUR_REPOSITORY.git
git branch -M main
git push -u origin main
At this point, GitHub becomes the source of truth. That matters because we want every server release to come from committed code, not from random manual edits inside cPanel.
Step 3: Create the application in cPanel
Now move to the cPanel side.
Open Setup Node.js App and create a new application. Use values similar to these:
- Node.js version: choose the newest stable version your host supports and that matches your project.
- Application mode:
Production - Application root: the folder where the repository will live, for example
repositories/myblog - Application URL: your domain or subdomain
- Application startup file:
server.js
After creating the app, cPanel usually gives you environment activation instructions similar to:
source /home/USERNAME/nodevenv/repositories/myblog/22/bin/activate
cd /home/USERNAME/repositories/myblog
Save those paths. They are important for your workflow.
Important beginner note
Do not press random buttons like Run JS Script with start if your app is already managed by Setup Node.js App. In this kind of hosting, cPanel owns the Node process. Your deployment should build the app and then let cPanel restart it properly.
Step 4: Put the code on the server with cPanel Git
Inside cPanel, open Git Version Control and create a repository on the server.
For example, this project uses:
/home/trynvtcp/repositories/myblog
You can either clone from GitHub or create the repository path first and connect it later. The main goal is simple: the server must have a Git working tree that GitHub Actions can update.
Once the repository exists on the server, make sure it is on the correct branch:
cd /home/USERNAME/repositories/YOUR_REPOSITORY
git branch
If needed:
git checkout main
Step 5: Create an SSH key for GitHub Actions
This is the part many junior developers find confusing, so let us make it simple.
GitHub Actions needs a secure way to log in to cPanel over SSH. The safest common approach is:
- Generate an SSH key pair only for deployment.
- Put the private key in GitHub secrets.
- Import the public key into cPanel and authorize it.
Generate the key on your machine:
ssh-keygen -t ed25519 -C "github-actions-cpanel-deploy" -f ~/.ssh/cpanel_deploy
This creates:
~/.ssh/cpanel_deployas the private key~/.ssh/cpanel_deploy.pubas the public key
Step 6: Import and authorize the key in cPanel
In cPanel, open SSH Access and then Manage SSH Keys.
Follow these steps:
- Click Import Key.
- Paste the public key from
cpanel_deploy.pub. - Save it.
- Find the imported key in the list.
- Click Manage.
- Click Authorize.
That authorization step is the missing link for many people. Importing the key is not enough. The key must be authorized before SSH login works.
Step 7: Add the deployment secrets in GitHub
In GitHub, go to:
Repository Settings → Environments → New environment
Create an environment named:
production
Then add these secrets or variables:
CPANEL_HOSTCPANEL_USERCPANEL_SSH_PRIVATE_KEYCPANEL_KNOWN_HOSTS
For this project, the deployment documentation uses these meanings:
CPANEL_HOST: your hosting server hostname or domainCPANEL_USER: your cPanel usernameCPANEL_SSH_PRIVATE_KEY: the private key content fromcpanel_deployCPANEL_KNOWN_HOSTS: the server host key output
To collect known hosts safely, run this on your machine:
ssh-keyscan -p 21098 YOUR_HOSTNAME
Then save the output as CPANEL_KNOWN_HOSTS.
If your host uses a different SSH port, replace 21098 with your actual port.
Step 8: Add the GitHub Actions workflow YAML
Create this file:
.github/workflows/deploy-cpanel.yml
Here is the important structure:
name: Deploy to cPanel

on:
  push:
    branches: [main]
  workflow_dispatch:

permissions:
  contents: read

concurrency:
  group: cpanel-production-deploy
  cancel-in-progress: false

jobs:
  deploy:
    runs-on: ubuntu-latest
    environment: production
    env:
      CPANEL_HOST: ${{ secrets.CPANEL_HOST || vars.CPANEL_HOST }}
      CPANEL_USER: ${{ secrets.CPANEL_USER || vars.CPANEL_USER }}
      CPANEL_KNOWN_HOSTS: ${{ secrets.CPANEL_KNOWN_HOSTS || vars.CPANEL_KNOWN_HOSTS }}
Then add steps to:
- Validate that required secrets exist.
- Write the SSH key into
~/.ssh. - Connect to cPanel over SSH.
- Fast-forward the repository on the server to
origin/main. - Install dependencies only when
package.jsonor the lockfile changed. - Build the app.
- Restart the app safely.
- Verify that the public site is really serving the newest Next.js assets.
Step 9: Understand the remote deployment script
This is the part that actually runs on the server.
In this project, the workflow uses values like these:
APP_ROOT="$HOME/repositories/myblog"
NODE_ENV_ROOT="$HOME/nodevenv/repositories/myblog/22"
SITE_URL="https://tryndev.com"
Those should match your real cPanel paths and domain.
The deployment script then follows this release order:
- Stash tracked server-side changes if someone manually edited files on the server.
- Fetch
origin/main. - Check whether dependency files changed.
- Merge with
git merge --ff-only origin/main. - Activate the Node environment created by cPanel.
- Stop only the current application processes.
- Run
npm install --include=dev --no-package-lockonly when needed. - Preserve the previous
.nextbuild as a rollback copy. - Run
npm run build:production. - Touch
tmp/restart.txtto wake the app. - Request the public site.
- Verify that the public HTML is pointing to the same asset hashes as the local Node origin.
This is much safer than a basic deploy script that only does git pull && npm install && npm run build.
Step 10: Why tmp/restart.txt matters
On many cPanel Node.js setups, touching this file tells Passenger or the hosting runtime to recycle the application:
mkdir -p tmp
rm -f tmp/restart.txt
touch tmp/restart.txt
This is one of the most important shared-hosting details to understand.
If you build the app but never trigger a proper restart, the public domain may still serve the old process and old asset references.
Step 11: Verify that the deployment is really live
One of the smartest parts of this deployment flow is the verification step.
It compares the asset URLs from:
- The public website
- The local Node origin on the server, usually
http://127.0.0.1:3000/
Example:
diff \
  <(curl -s http://127.0.0.1:3000/ | grep -oE '/_next/static/[^" ]+\.(css|js)' | sort -u) \
  <(curl -ks https://YOUR_DOMAIN/ | grep -oE '/_next/static/[^" ]+\.(css|js)' | sort -u)
If there is no output, the deployed build is consistent.
If the hashes differ, your public site may still be serving stale HTML or an old LiteSpeed process.
Step 12: Manual recovery when something goes wrong
Even with automation, it is good to know the manual fallback.
The safe manual order is:
- Stop the app from Setup Node.js App.
- Confirm the old process is really stopped.
- Activate the node environment.
- Go to the repository folder.
- Install dependencies if needed.
- Remove
.next. - Build again.
- Touch
tmp/restart.txt. - Start the app again from cPanel.
Example commands:
source /home/USERNAME/nodevenv/repositories/YOUR_REPOSITORY/22/bin/activate
cd /home/USERNAME/repositories/YOUR_REPOSITORY
npm install --include=dev --no-package-lock
rm -rf .next
npm run build:production
mkdir -p tmp
touch tmp/restart.txt
Common mistakes to avoid
Here are the problems I see most often:
1. Running the app manually instead of through cPanel
Avoid using:
npm start
node server.js
for the long-running production process on shared hosting. Build through SSH if needed, but let cPanel own the runtime.
2. Forgetting to authorize the imported SSH key
Importing is not enough. The public key must be authorized in SSH Access.
3. Using the wrong startup file
If cPanel is configured with the wrong startup file, the app may build successfully but fail to run.
4. Using paths copied from a different server
Always confirm the real values for:
- repository path
- node environment path
- domain
- SSH port
5. Trusting a deploy without verification
Sometimes the build passes but the public domain still serves old asset hashes. This is why the asset verification step is so valuable.
A practical YAML mindset for junior developers
When you read a deployment workflow, do not think of it as magic. Read it as a checklist:
- Can GitHub log in to the server?
- Does the server have the newest code?
- Are dependencies installed?
- Did the build succeed?
- Did the application restart?
- Is the public site actually serving the new release?
- Is there a rollback path if verification fails?
If your YAML answers all seven questions, you already have a much stronger deployment workflow than most beginner setups.
My recommendation
If you are deploying a Next.js project to cPanel shared hosting, I recommend this pattern:
- Keep the project in GitHub.
- Use a dedicated deployment SSH key.
- Authorize the public key in cPanel.
- Use GitHub Actions for the release.
- Build on the server only after syncing the exact Git commit.
- Restart using
tmp/restart.txt. - Verify public asset hashes after every deployment.
That gives you a workflow that is still simple enough for a small project, but much safer than manual deployment.
Final thoughts
cPanel shared hosting is not the most modern deployment target for Node.js work, but that does not mean it has to be messy.
Once you connect Git, GitHub, SSH authorization, cPanel Node.js configuration, and a careful YAML deployment script, the process becomes repeatable and much less stressful.
If you are building for clients, side projects, or small business sites on cPanel, this setup is a very practical middle ground between fully manual deployment and expensive infrastructure.